Friday, 17 September 2010

Receive Error When CD is Put in Computer

Search:


Issue:

Receive error when CD is put in computer.

Cause:

There are several possible reasons your CD-ROM may generate errors when placed in the computer. Below are the most common reasons, which are also discussed in this document.

  1. Dirty CD-ROM drive or CD causing CD not to be read properly.
  2. Third-party program running causing issue.
  3. CD-ROM not setup properly.
  4. CD is a bad burned CD or CD was copied from protected CD.
  5. CD is auto-running causing error.
  6. Windows is corrupted causing CD to generate error.

Solution:

Dirty CD-ROM drive or CD causing CD not to be read properly

Generally, it is very common for dust, dirt, hair or other material on a CD or CD-ROM drive to cause the CD to be improperly read or generate errors because data cannot be read from the CD.

  • See our Cleaning page for additional information on how to properly clean your CDs and CD-ROM drive.

Third-party program running causing issue

It is possible that third-party programs that may be running or running in the background are causing errors with the CD; it is recommended you close all programs as well as End task any programs that may be running in the background to ensure they are not causing your issues.

  • See document CHTSR for additional information on how to temporally remove all third-party programs that may be running in the background.

CD-ROM not setup properly

If the CD-ROM is not installed or setup properly this can cause the CDs to not be read or be read properly. If you are using Windows 95 or Windows 98 it is recommended that you check in Device Manager and verify no conflicts or errors are currently occurring with the installed CD-ROM drive.

CD is a bad burned CD or CD was copied from protected CD

If you have created a CD (burned a CD) and are unable to read it or are getting errors with the CD, it is likely that either the CD was burned improperly or that the CD you copied was protected and that it cannot be copied. It is recommended you either attempt to burn the CD again or verify with the software vendor to verify that the CD is not protected from being copied.

CD is auto-running causing error

If you are using Windows 95 or Windows 98, autorun can, in some cases, cause errors when first placed in the computer. It is recommended that you eject the CD from the computer and when the CD is placed back into the computer, hold the left shift key on the keyboard. Holding the left shift key down will disable the auto-running feature temporarily. Once the CD-ROM light is done flashing, if you receive no error, open My Computer and right-click on the CD-ROM drive and click Explore to see if you receive errors reading the CD.

Windows is corrupted causing CD to generate error

If you are running Windows 95, Windows 98 or Windows ME, it is possible that Windows may be corrupted causing the CD-ROM drive to not be properly read and we recommend that it be tested from MS-DOS. Before trying the below recommendation, ensure that you have tried all of the above steps first.

We recommend that you use a bootable diskette that has CD-ROM drivers on it and test the CD-ROM drive from MS-DOS.

If you receive errors from MS-DOS it is likely that the CD-ROM drive is bad.

If you do not receive errors from MS-DOS and the CD-ROM drive reads properly, it is likely that Windows is corrupted and we recommend that it be reinstalled.

  • Additional information on bootable disks can be found on our boot disk page.

Bad drive / bad discs

If you've determined you're only encountering errors with only one disc you can attempt to recover the data from the disc and/or test the drive further using the software programs in document CH001090.

Search:

USB Device not Recognized in Windows

Search:

USB Device not recognized, Error USB Device, USB Device, Trouble USB Device, Syntac Error USB Device

Are you getting a “USB device not recognized” error whenever you plug in a USB mouse, keyboard, or other USB device? I love USB and have 5 ports on my computer so that I can connect my mouse, keyboard, camera, phone, and printer to it all at once!

However, last weekend, my computer stopped recognizing my USB devices! The strange thing about it was that the USB ports were not bad because all of my devices were still getting power to them. I could still charge my cell phone without a problem!

usb device not recognized

So I started with the normal fixing methods, including uninstalling the drivers for my devices and reinstalling them. That didn’t work! Next I tried System Restore thinking that maybe I had installed something and it caused a conflict with the USB system drivers. That didn’t work!

I read online that in order to fix this problem I should go to Device Manager and uninstall all of the devices under USB Controllers. Restarted the computer, reinstalled the USB drivers, but the problem STILL did not go away!

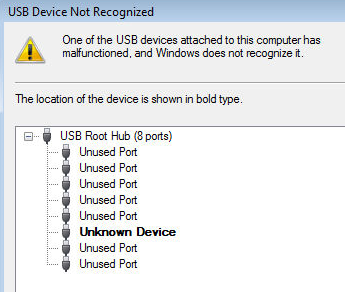
You may also see in Device Manager that the device shows up as an “Unknown Device”.

unknown usb device

So how did I finally fix the problem? Well, apparently it’s a super simple solution! No need to edit the registry, uninstall drivers, or anything of that sort.

Simply UNPLUG YOUR COMPUTER FROM THE POWER SUPPLY. Yes that’s it! Note that this does not mean just turning off your computer because modern computers don’t really turn off when you press the power button as the motherboard still gets power.

First to explain, the motherboard is where all of hardware of the computer is connected to, including the USB ports. Sometimes the motherboard needs to be “rebooted” also because something can go wrong, i.e. all your USB ports suddenly stop working. The small microprocessor on the motherboard will reload the drivers and your USB ports should be back to recognizing all devices!

So first turn off your computer using Shut Down or pressing the power button and then UNPLUG it from the wall outlet. Let it sit for about a minute and then plug it back in.

Hope this helps someone fix that pesky “USB device not recognized” Windows error!


Search:

USB Device not recognized, Error USB Device, USB Device, Trouble USB Device, Syntac Error USB Device

Wednesday, 15 September 2010

Upgrade to Windows XP SP3

Search:


Windows XP SP3 - What You Need to Know

Windows XP SP3

Windows XP SP3 is the final service pack for Windows XP. It includes over 1,000 service patches that have been released since SP2, as well as several patches and updates provided by SP1 and SP2. In addition to all of these patches and hotfixes, Windows XP SP3 also includes a few new features. The Windows XP SP3 package was made public on May 6, 2008, after a few last-minutes delays to resolve compatibility problems.

New Features Offered by Windows XP SP3

Windows XP SP3 also includes a boatload of patches and security fixes, as well as four new XP features.

  1. The first new feature was the "Blackhole" router detection algorithm. This addition will allow your Windows XP machine to deal with network routers that silently drop various types of network packets, improving the reliability of communication over network paths.
  2. The second addition is the Product Key-less Install Option. As the name of this feature suggests, it allows you to complete the installation process without having to enter your Windows product key. But don't worry, Windows will ask for the product key later, as part of Genuine Advantage. Whew!
  3. The third new feature offered by this release is the Network Access Protector Compatibility module. This module, which is also in the Vista code, allows organizations running Windows XP to take advantage of new features in Windows Server 2008, and allows XP to better protect network assets by requiring compliance with a set of "health" requirements imposed on remote systems that want to connect to the network.
  4. The final addition offered by Windows XP SP3 is the Kernel Mode Cryptographic Module. This module, according to Microsoft, encapsulates several different cryptographic algorithms for use by other kernel mode drivers. It ummm, well... let's just say it boosts overall security. Yeah, that sounds good.

Who Should Install Windows XP SP3

If you are a Windows XP user; if you use the Home Edition, Tablet PC Edition, Professional Edition or the Media Center Edition; and you intend to continue to use this OS, then you need the Windows XP SP3 even if you have been downloading and installing patches as they were released. If you have failed to keep up to date with the latest XP patches, and if you have not installed SP1 or SP2 then you will need to install at least Windows XP SP1 before you try to install the Windows XP SP3.

Reports About Windows XP SP3

So far the reports back on Windows XP SP3 have been limited but positive. You won't notice any changes to the look and feel of Windows XP, but some users have reported an increase in performance by as much as 10 percent after installing this service pack. It seems unlikely that you'll have any serious problems caused by upgrading to SP3, but if you have trouble after doing so, you can boot up into Safe Mode and uninstall Windows XP SP3 using the "Add and Remove Programs" icon in the Control Panel, or by doing a System Restore.

UPDATE: After publishing this article, I received some reports from users who installed SP3 and it turned out to be a show stopper. The common thread seems to be certain HP/Compaq systems with AMD processors. If you get stuck with an SP3 problem, you can visit this HP SP3 help page, or Microsoft has setup a free SP3 tech support hotline: 866-234-6020. See more in the comments below.

Where to Get Your Copy of Windows XP SP3

The best place to download Windows XP SP3 is at Microsoft's website. To begin, read the Windows XP Service Pack 3 Overview document which provides instructions and information packets that you can download in PDF or Word format.

You can download the XP SP3 package via Windows Update, which is recommended for people who want to update just one computer. If you are updating multiple computers, you may want to download the stand-alone SP3 installer. Weighing in at 316MB, it will take a while to download, though. Expect about an hour if you have DSL, or about 15 minutes on a zippy cable modem connection.

If you're in no hurry to get XP SP3, just wait until sometime this summer and Windows will automatically download and install XP SP3, assuming you have that option enabled in Windows Update (and you should). Go to Control Panel / Security Center to make sure Automatic Updates are turned on.

Microsoft warns against other sites claiming to offer XP SP3 downloads, and this is good advice. If you find the SP3 package anywhere else, it's probably a rogue copy that will wreak havoc on your system.

Sticking With it or Moving On?

The biggest question that has been raised since the release of the final patch service pack for Windows XP is whether Windows users should stick with XP or upgrade to Vista. I'd put it this way: if you have a machine that's running Windows XP, and you're happy with it, stay away from Vista for now. It's well documented that Vista requires more system resources from your computer and will run SLOWER than the same machine with XP installed. I just purchased a new PC for my Dad, who is in his 70's, and was happy that Dell offered the option to install XP.

If XP SP3 delivers the security and performance improvements promised, then many users are going to stick with XP instead of dealing with a new set of problems in Vista. Have you installed the SP3 package? Share your experience here by posting a comment below...

source : http://askbobrankin.com/upgrade_to_windows_xp_sp3.html


Search:

Monday, 13 September 2010

How to create PDF from Microsoft Word

Searching for:


How to create PDF from Microsoft Word / How to convert DOC to PDF

1. Start Microsoft Word

2. Open a .DOC document

3. Select from main menu "File"->"Print"

4. Select Printer "Virtual PDF Printer"

5. If you need to adjust PDF generation options, click the "Property" button on the right

6. Click "OK"

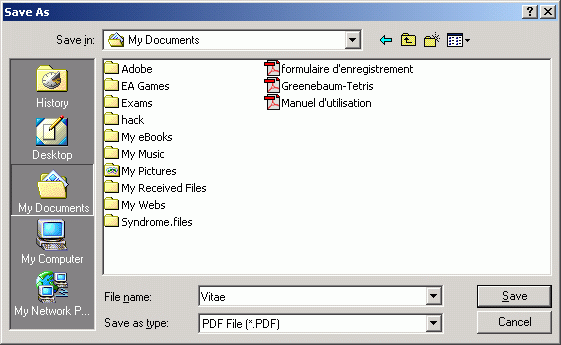
7. A dialog will pop up, assign the folder and file name of the PDF document to be generated

8. Congratulations! You have converted Microsoft Word DOC to PDF document now.

Searching for:

PDF Pasword Remover

Saturday, 4 September 2010

Hard Drive Partitioning

Searching for:

Hard Drive Partitioning, Partitions Hard drive, Partition Drive, Hard Disk, Disk Partition, Disk Drive Partitions, Hard Drive Partitions, Hard Drive Partitioning, Partitions Hard drive, Partition Drive, Hard Disk, Disk Partition, Disk Drive Partitions, Hard Drive Partitions, Hard Drive Partitioning, Partitions Hard drive, Partition Drive, Hard Disk, Disk Partition, Disk Drive Partitions, Hard Drive Partitions, Hard Drive Partitioning, Partitions Hard drive, Partition Drive, Hard Disk, Disk Partition, Disk Drive Partitions, Hard Drive Partitions, Hard Drive Partitioning, Partitions Hard drive, Partition Drive, Hard Disk, Disk Partition, Disk Drive Partitions, Hard Drive Partitions, Hard Drive Partitioning, Partitions Hard drive, Partition Drive, Hard Disk, Disk Partition, Disk Drive Partitions, Hard Drive Partitions

Disk partitioning divides the data storage space of a hard disk into separate areas referred to as 'partitions'. Partitions are usually created when the hard disk is first being prepared for usage. Once a disk is divided into partitions, directories and files may be stored on them. Because of later changes on the computer and operating system, often an administrator or power user will be faced with the need to resize partitions, create new partitions in the unallocated space, and sometimes even undelete partitions that were previously removed or deleted.

Petri Recommended: Safe & Easy Hard Drive Partitioning

Partition Commander from Avanquest Software safely organizes your hard drive so that your favorite applications, games and even your operating system run faster.

Best of all, everything is automated. Simply follow a few steps and you're done. It couldn't be easier!

Grab the Download Version Now!

Hard disk partitioning tools will allow you to create additional partitions from existing ones by resizing the existing partitions and creating empty, un-used space on which you can create new partitions. The most important aspect of such tools is their ability to do this without losing your data that is currently on your existing partitions. Such tools allow you to create and format these new partitions.

Hard Drive Partitioning: Use Caution!

Most tools will let you convert a partition from one file type to another, i.e. from NTFS to FAT/FAT32 or vice versa. Needless to say that in most cases, such a conversion, especially from NTFS to FAT/FAT32 will cause the files to lose their NTFS permissions (ACLs), and in some cases where EFS was used to encrypt the files, it will actually cause you to lose access to these files. So beware!

Some of these tools may be able to help you recover deleted partitions, and if data on that disk was un-damaged, actually help you gain access to that data. Some, but not all of the tools may have the ability to move existing partitions from one location on the disk to another location, again, without losing data.

Note: We've tried to make this guide as definitive as possible, there are always changes in the software world that we're not aware of. We would gladly accept your feedback, comments and tool recommendations. Please limit your feedback to freeware utilities.

Disclaimer: The author of this article cannot be held responsible for any data loss or computer malfunction due to using any of the tools listed in this article. Please carefully read the software creators’ read-me files and manuals, and always test before using any tool on a computer or hard disk that holds critical information. Remember as well that free products rarely, if ever, provide any kind of end user support other than forum or community support. If you're unsure of what you're doing, or need technical support, it's best to go with a paid product... Read More Partitions

Searching for:

Hard Drive Partitioning, Partitions Hard drive, Partition Drive, Hard Disk, Disk Partition, Disk Drive Partitions, Hard Drive Partitions, Hard Drive Partitioning, Partitions Hard drive, Partition Drive, Hard Disk, Disk Partition, Disk Drive Partitions, Hard Drive Partitions, Hard Drive Partitioning, Partitions Hard drive, Partition Drive, Hard Disk, Disk Partition, Disk Drive Partitions, Hard Drive Partitions, Hard Drive Partitioning, Partitions Hard drive, Partition Drive, Hard Disk, Disk Partition, Disk Drive Partitions, Hard Drive Partitions, Hard Drive Partitioning, Partitions Hard drive, Partition Drive, Hard Disk, Disk Partition, Disk Drive Partitions, Hard Drive Partitions, Hard Drive Partitioning, Partitions Hard drive, Partition Drive, Hard Disk, Disk Partition, Disk Drive Partitions, Hard Drive Partitions

Create PDF using Smart PDF Creator

Searching for:
PDF Creator, Smart PDF Creator, How to use Smart PDF Creator, How to Create PDF, Convert PDF, PDF Creator, Smart PDF Creator, How to use Smart PDF Creator, How to Create PDF, Convert PDF, PDF Creator, Smart PDF Creator, How to use Smart PDF Creator, How to Create PDF, Convert PDF, PDF Creator, Smart PDF Creator, How to use Smart PDF Creator, How to Create PDF, Convert PDF, PDF Creator, Smart PDF Creator, How to use Smart PDF Creator, How to Create PDF, Convert PDF, PDF Creator, Smart PDF Creator, How to use Smart PDF Creator, How to Create PDF, Convert PDF, PDF Creator, Smart PDF Creator, How to use Smart PDF Creator, How to Create PDF, Convert PDF, PDF Creator, Smart PDF Creator, How to use Smart PDF Creator, How to Create PDF, Convert PDF, PDF Creator, Smart PDF Creator, How to use Smart PDF Creator, How to Create PDF, Convert PDF

Easy to use

Smart PDF Creator is different for its ease of use. Just click with the right mouse button on a file and select Convert to PDF.

Password protect your PDF documents

You can set User and Owner passwords. You can allow or forbid Content Copying or Extraction, Form Filling, Signing, Commenting, Changing the Document, Printing.

Encrypt your PDF files

Smart PDF Creator can create encrypted PDF documents. You can chose between two levels of encryption - Low (40-bit RC4) and High (128-bit RC4).

Batch Conversion

You can convert all your documents to PDF at once. Just add them to the main window of Smart PDF Creator and clickConvert

A Toolbar in MS Word

Smart PDF Creator inserts a toolbar in Microsoft Word that makes PDF creation easier. You can edit your documents in Word then click the Create PDF button and your PDF file is ready.

With the Pro version you will even be able to open your PDF documents in Word, by clicking Open PDF, edit them and then save them back as PDF.

Integration into Windows menus

You can now easily convert a document to PDF. Just click with the right mouse button on the file in My Computer or Windows Explorer and select Convert to PDF. With the Pro version you'll be able to right click on a PDF file and select Open PDF with MS Word or Convert PDF to editable format. This way you can easily edit your PDF documents.

Edit your PDF documents

PDF is a great format but we all know how inconvenient it can be if you want to change something in a PDF file. With Smart DPF Creator Pro you can now effectively edit a PDF document. Just click Open PDF from the MS Word Toolbar or from the context menu in My Computer, then edit the document and save back to PDF. It is that easy.

Convert PDF to DOC and other file formats

With the Pro version Smart PDF Creator will convert your PDF documents back to Word, HTML, RTF, TXT, JPEG, TIFF, BMP and PNG.

Creates Compressed PDF files

Smart PDF Creator creates compressed PDF documents using the Flate algorythm.

Creates Searchable PDF files

The files that you create with Smart PDF Creator will include text information but not only the image of the page. This will allow you to search for text in the document or extract text information.

Automatically open PDF files after creation

After you have created a PDF document you will be able to open the new file wit just one mouse click. Similarly you will be able to open the folder that the newly created PDF is in.

Configurable embedding of fonts

One of the things that makes PDF useful is that that PDF documents embed the fonts which they use. So if you send a PDF to someone else they will be able to read the document even if the fonts used are not installed on their system. The only drawback is that this will make your PDF document larger. With Smart PDF Creator you can choose not to embed the fonts in the output PDF file. This is useful in case you are using standard fonts, such as Arial or Times New Roman that are normally installed on any Windows system or in case you are not going to send the PDF document but use it yourself. This will help you to decrease the size of your PDF document.

Click Start, Printers and Faxes, and click with the right mouse button on SmartSoft PDF Printer. Select Properties and go to the Additional tab. Click Additional. Go to the PDF tab and uncheck the Do not embed any fonts checkbox.

Support for Windows Vista and both 32 and 64-bit systems

SmartSoft PDF Creator will automatically detect what is your operating system version and will install the appropriate components.

Configurable PDF document properties

You can set properties such as Title, Author, Subject and Key Words. These are easily accessible from the Save as window that opens when you create a PDF document.

Option for creating Separate PDF for each page

Click Start, Printers and Faxes, and click with the right mouse button on SmartSoft PDF Printer. Select Properties and go to the Additional tab. Click Additional. Go to the PDF tab and check the Separate PDF file for each printed pagecheckbox.

Specify Page Layout

You can select among Single Page, Continuous, Facing and Continuous - Facing

Specify Page Mode

You can select among Normal, Outlines, Thumbnails and Full Screen

Set Images Compression

You can select among Flate, JPEG, CCITT3, CCITT32d and CCITT4

Set JPEG Quality

If you set Images Compression to JPEG you can also set JPEG quality. This will affect the resulting file's size.


DOWNLOAD Smart PDF Creator FULL NEW VERSION

Searching for:
PDF Creator, Smart PDF Creator, How to use Smart PDF Creator, How to Create PDF, Convert PDF, PDF Creator, Smart PDF Creator, How to use Smart PDF Creator, How to Create PDF, Convert PDF, PDF Creator, Smart PDF Creator, How to use Smart PDF Creator, How to Create PDF, Convert PDF, PDF Creator, Smart PDF Creator, How to use Smart PDF Creator, How to Create PDF, Convert PDF, PDF Creator, Smart PDF Creator, How to use Smart PDF Creator, How to Create PDF, Convert PDF, PDF Creator, Smart PDF Creator, How to use Smart PDF Creator, How to Create PDF, Convert PDF, PDF Creator, Smart PDF Creator, How to use Smart PDF Creator, How to Create PDF, Convert PDF, PDF Creator, Smart PDF Creator, How to use Smart PDF Creator, How to Create PDF, Convert PDF, PDF Creator, Smart PDF Creator, How to use Smart PDF Creator, How to Create PDF, Convert PDF

Categories

Access Media Collection Add HTML facebook on site addurl Administration Tools Adsense All Cat Anatomy Virus Android Animator Anomymity Anti Virus Applications Install BELAJAR PHOTOSHOP Blog Blufftop CA-CLIPPER INTERNAL ERROR cara cari uang dari internet cari uang dari internet cashfiesta Celebs Computer Desk Computer Hang Computer Icon Computer Management Computer Repair Computer Set Up Computer Tablet Computer Touch Screen Computer Troubleshooting Cookies Cookies Definitions Crack Create DVD Create DVD Maker Create PDF Create PDF using Smart PDF Creator D-Link D-Link Router Definitions of Virus Device Device Manager DNS Doc Protect Dongle USB Drive partitions Drive parts Driver Printer HP DVD compress DVD Drive Earn Money Easy Gif Animator Elastomer Eror Solution Error Computer ERROR Solutions Error windows explorer External Hard Drive Facebook Facebook and Site File Sharing Football Game Free Articles Free Internet GAME Game Sport Googel Google Talk Hack Password Hard Drive Hard Drive Partitioning Healty Help and Support Help Support Household Aplieance How to How to Download HP Lapotop Reviews IM Google Inside Adsense intall Intall Windows 7 Ultimates Internet Internet Browser Internet Explore Ipad Java Programe Java Script JPEG JPG GIF PNG BMP Keyboard Keygen Smadav 8.7 Laptop Laptop Computer Skin Laptop vs PC Life Style Local Area Network Maintanance and Repair Make CD iso Make DVD Make money online Make Money with blog Make Your Own Copy-Protected CD with Passive Protection Messenger and Chat Microsoft Mobile Aplications Mobile Phone Modem MotorSport MOVIE Ms Word Applications MS Word to PDF Ms Words My Computer Network Set Up Networking Office Online Shoping Operating System Partitions drive Password Wifi PC Desktop PDF EDITOR PDF Remover Photoshop Picture Portable Prevent Windows XP Print Printer Error Protect CD from Copy Protect Your Computer Reboot Application Remove Pasword Excel Restore Windows Registry Router Search Engine Index Search Engines Optimizer Security Security System Shortcut Smadav 8.7 Smart PDF Creator Social Networking Software software Protection Solving Probelm Startup Programs SuperBike System Registry System Restore Table Manager Test DVD Test DVD Drive Troubleshooting all Tutorial Tutorial Java TUTORIAL PHOTOSHOP uang gratis dari cashfiesta uang gratis dari internet Upload File to blogger Upload Files USB Install USB REMOVE USB Repair VGA Card VGA Conector VGA Informations Virtual Memory is to Low Virus Viture Windows 7 Watermark What is Cookies Wifi Wifi Pasword Finder Win Pes2011 Windows Windows Device Windows DVD Maker windows explorer cannot open Windows Mobile Wireless Wireless router Word Password Remover words documents cannot open Words error XFBML and HTML Facebook