Sunday, 3 October 2010

Top 5 Computer Security Tips

With Ads like Mac Vs PC floating around in full force arguing which OS is more safe against viruses like it’s a computers prime selling point, just how big of a deal are viruses now? Even the unreleased Windows 7 isn’t safe from being infected by viruses if it’s used improperly, so they’re a big deal. What can you do to protect yourself from an onslaught of viruses? This article will provide you with a few tips that will keep your computer running smooth and virus free.
Step up your security.

1. Use Up to Date Anti-Virus Software-Perhaps the best way to keep your computer safe from the threat of viruses is anti-virus software. It’s very important to download a noteworthy company’s software such as: Ad-aware, Spybot or Avast. These companies all offer free anti-virus that’s constantly updated. It’s important when downloading anti-virus software that you’re not downloading a virus itself, because that’s one of their most common disguises. That’s why you should always stick with a trusted company.

2. Be Safe With Email- Email is one of the easiest ways to become a victim of a large scale virus infection, and the easiest way to avoid it is to not open any suspicious email or follow any odd links and attachments. If you know the sender and the attachment still seems fishy, simply ask them by phone or in person before you open the attachment.

3. Better Passwords- This has become something that companies are enforcing, but it’s still something that needs to be emphasized, use strong passwords. Don’t simply make your password your first name or your dog’s name. You need to add numbers and special characters such as a # sign to your password. This will make it much more difficult for any potential hacker/virus program to affect you. If you can’t remember long passwords, try using phrases as they usually make the best passwords.

4. Use Anti-Spyware Programs- Although many of these programs becoming pre-packaged with anti-virus programs, it’s still important to note that spyware is much more commonly affecting your computer than a virus. It may come in the form of ads popping up on your desktop, or even just a program running in your background eating your memory. They may not be viruses, but they’re deadly and it’s important you prepare for them.

5. Watch Where You Download from- Where you download files from plays one of the biggest roles in whether you’re likely to get a virus or not. Avoid using P2P networks as much as possible as they’re probably the most unsafe downloading environments there are. If you visit a website and a message box comes up asking you to install (yes or no) always ctl-alt-delete exit the website immediately. This is one of the easiest ways to allow your computer to be infected.

How to Shutdown Faster

If you installed many programs in Windows XP, it takes much time to start. Again, if you want to shutdown Windows XP, it also takes much time. Sometimes, several messages also shown. The End Program is the most boring thing. You may notice the message like do you want to save your work or the current session............or The program is still running, are you sure want to quit...etc. But there is an alternate process to shutdown your computer very quickly. This page will tell you the techniques to shutdown your Windows quickly. This process works all of the windows operating system.

Steps to shutdown Windows quickly

The following method is applicable to any Windows operating system like Windows 95, Windows 98, Windows 2000 Professional, Windows 2000 server, Windows XP etc. Follow the following steps to shut down your Windows quickly:

Step 1:

Right-click on the desktop with your mouse and choose New and then selectShortcut.

Select the "Shortcut"

Step 2:

Now, a Create Shortcut window will be opened and there there is a text box below the writings Type the location of the space. Now write shutdown -s -t 30 in that space. After writing this, click on Next button.

Note: The command shutdown -s -t 30 and the custiomization of that command will be discussed at the end of these steps.

Type "shutdown -s -t 30"

Step 3:

In this step you will be prompted Select a TItle for the Program dialog box. Write a name ot the shortcut in the Type a name for this shortcut text box. Say, you name it Shutdown.exe. At last, click on Finish button.

It's all about shutdown quickly in your windows. Now, when you want to shutdown your Windows quickly, just double click on that executable file which we saved asshutdown.exe. After double-clicking you will see that your Windows operating system is shutdown quickly.

Expanation of "shutdown -s -t 30"

shutdown : this command is used to stop the local client

-s: It's a attribute which is used to mean turn off the computer.

-t: This attribute is used to tell the Windows how many seconds it will wait till shutdown.

30 : This is a value to define the time to wait before your Windows operation system will be shutdown. If you want to change the time value, you just change it.

You can easily customize the command. For example, if you want to shutdown your Windows within 40 seconds then you have to write the command like the followings:

shutdown -s -t 40

Change Your Desktop Wallpapers the Easy Way with DeskSlide

Looking to add some variety to your desktop instead of looking at the same wallpaper day in and day out? Have fun changing your wallpapers automatically with DeskSlide.

DeskSlide Setup

As soon as you finish installing DeskSlide and start it up, you will be presented with the Configuration Wizard. The Currently Displayed Photo Window will also automatically display at the same time. Click “Next” to get started.

deskslide-01

This is where you will be able to add any photo folders that you want to DeskSlide’s photo library list. Click on the “Plus Sign” to add a folder and on the “Minus Sign” to remove one.

deskslide-02

Here is an example of how the listing will look. Once you have finished, click “Apply” and then “Next”. You can also include subfolders if you desire (very nice!).

deskslide-03

Choose the layout style that you would like to use with your photos and decide what DeskSlide will do with small photos. Notice that you can specify a specific size for what is classified as a small photo (nice!). Click “Next”.

deskslide-04

Specify the amount of time that you would like in between changes to your wallpaper. Click “Next”.

deskslide-05

That now has DeskSlide configured to suit your personal style. Click “Finish” to exit the Configuration Wizard.

deskslide-06

DeskSlide Management

Once you have exited the Configuration Wizard, you will be able to view the Currently Displayed Photo and the Current Photo List Windows. You can easily access both windows at any time as shown here.

deskslide-07

The Right Click Menu for the Current Photo List Window…

deskslide-08

And the Right Click Menu for the System Tray Icon.

deskslide-09

Conclusion

If you are looking for an easy way to add some variety to your desktop, then DeskSlide can provide a simple hassle-free way to change your wallpaper and brighten up your day. Have fun!

Add keyboard languages to XP, Vista, and Windows 7

Do you regularly need to type in multiple languages in Windows? Here we’ll show you the easy way to add and change input languages to your keyboard in XP, Vista, and Windows 7.

Windows Vista and 7 come preinstalled with support for viewing a wide variety of languages, so adding an input language is fairly simply. Adding an input language is slightly more difficult in XP, and requires installing additional files if you need an Asian or Complex script language. First we show how to add an input language in Windows Vista and 7; it’s basically the same in both versions. Then, we show how to add a language to XP, and also how to add Complex Script support.

Please note that this is only for adding an input language, which will allow you to type in the language you select. This does not change your user interface language.

Change keyboard language in Windows 7 and Vista

It is fairly simple to add or change a keyboard language in Windows 7 or Vista. In Windows 7, enter “keyboard language” in the Start menu search box, and select “Change keyboards or other input methods”.

sshot-2010-03-08-[18-50-10]

In Windows Vista, open Control Panel and enter “input language” in the search box and select “Change keyboards or other input methods”. This also works in Windows 7.

sshot-108

Now, click Change Keyboards to add another keyboard language or change your default one.

image

Our default input language is US English, and our default keyboard is the US keyboard layout. Click Add to insert another input language while still leaving your default input language installed.

image

Here we selected the standard Thai keyboard language (Thai Kedmanee), but you can select any language you want. Windows offers almost any language you can imagine, so just look for the language you want, select it, and click Ok.

image

Alternately, if you want, you can click Preview to see your layout choice before accepting it. This is only the default characters, not ones that will be activated with Shift or other keys (many Asian languages use many more characters than English, and require the use of Shift and other keys to access them all). Once your finished previewing, click close and then press Ok on the previous dialog.

image

Now you will see both of your keyboard languages in the Installed services box. You can click Add to go back and get more, or move your selected language up or down (to change its priority), or simply click Apply to add the new language.

image

Also, you can now change the default input language from the top menu. This is the language that your keyboard will start with when you boot your computer. So, if you mainly use English but also use another language, usually it is best to leave English as your default input language.

image

Once you’ve pressed Apply or Ok, you will see a new icon beside your system tray with the initials of your default input language.

image

If you click it, you can switch between input languages. Alternately you can switch input languages by pressing Alt+Shift on your keyboard.

image

Some complex languages, such as Chinese, may have extra buttons to change input modes to accommodate their large alphabet.

image

If you would like to change the keyboard shortcut for changing languages, go back to the Input Languages dialog, and select the “Advanced Key Settings” tab. Here you can change settings for Caps Lock and change or add key sequences to change between languages.

Access and Launch Windows Utilities the Easy Way

Tired of having to dig through the Control Panel (or deeper parts of the Start Menu) just to access and use various Windows Utilities? Enjoy having super quick (and easy) access to those utilities with Windows Utilities Launcher.

Note: Requires .NET Framework 3.5+ (link provided at bottom of article).

Setup

Windows Utilities Launcher is wonderfully simple to set up…just unzip the exe file, place it in a “Program Files” folder, and create a shortcut. Get ready for instant access goodness!

This is what you will see as soon as you start Windows Utilities Launcher… In the “Utilities Tab Area” you can quickly access the utilities shown with a single click of the button beneath each listing. Notice that you can easily minimize Windows Utilities Launcher to the “System Tray” or exit the program using the two buttons in the lower right corner. Windows Utilities Launcher will also display the version of Windows that you are using in the “Status Bar”.

Note: Windows (Computer) Info works on Vista & 7 only.

wul-01

The “Settings Tab Area” lets you decide if you would like to have Windows Utilities Launcher start up with Windows each time and if you would like to have the app start as minimized.

wul-02

The “About Tab Area” provides basic app information and also a way to contact the developer.

wul-03

The Right Click Menus

Time for a closer look at the “Right Click Menu” setup for Windows Utilities Launcher. Here you can see the main menu… Notice that there are two additional apps that you can access here (Notepad & Calculator).

wul-04

Use the “Windows Utilities” sub-menu as an alternate way to quickly access individual Windows Utilities.

wul-05

Windows Utilities Launcher in Action

For our example we decided to access the “Date and Time Utility”. With a single click the “Date and Time” window opened very quickly. We had the same great result on any of the other utilities that we chose…quick and easy access.

wul-06

Conclusion

Windows Utilities Launcher is still in the earlier stages of development, but this little app is already demonstrating how easy it should and can be to access common Windows Utilities. This is definitely worth trying out…have fun!

Friday, 1 October 2010

C:\WINDOWS\system32\MSCTF.dll - invalid Windows image?

Error sytems:

When I right-click on the Desktop to choose Properties, it appears a message box :
- The application or DLL C:\WINDOWS\system32\MSCTF.dll is not a valid Windows image. Please check this against your installation diskette.
And then, I've ever accessed the Properties anymore.
======================================================================================
Insert your windows CD. Search the cd for the file MSCTF.dll, once it shows up right click on it, click copy. Then open another window and go to C:\WINDOWS\system32 then right click an empty spot in there and click "Paste". Something will come up asking "This file already exists. Would you like to replace it?" Click "Yes" Or "Replace". Then restart your computer. That should fix all your problems and lead you to a wonderful and fufilled life.

Search:
C:\WINDOWS\system32\MSCTF.dll - invalid Windows image?

Friday, 17 September 2010

Receive Error When CD is Put in Computer

Search:


Issue:

Receive error when CD is put in computer.

Cause:

There are several possible reasons your CD-ROM may generate errors when placed in the computer. Below are the most common reasons, which are also discussed in this document.

  1. Dirty CD-ROM drive or CD causing CD not to be read properly.
  2. Third-party program running causing issue.
  3. CD-ROM not setup properly.
  4. CD is a bad burned CD or CD was copied from protected CD.
  5. CD is auto-running causing error.
  6. Windows is corrupted causing CD to generate error.

Solution:

Dirty CD-ROM drive or CD causing CD not to be read properly

Generally, it is very common for dust, dirt, hair or other material on a CD or CD-ROM drive to cause the CD to be improperly read or generate errors because data cannot be read from the CD.

  • See our Cleaning page for additional information on how to properly clean your CDs and CD-ROM drive.

Third-party program running causing issue

It is possible that third-party programs that may be running or running in the background are causing errors with the CD; it is recommended you close all programs as well as End task any programs that may be running in the background to ensure they are not causing your issues.

  • See document CHTSR for additional information on how to temporally remove all third-party programs that may be running in the background.

CD-ROM not setup properly

If the CD-ROM is not installed or setup properly this can cause the CDs to not be read or be read properly. If you are using Windows 95 or Windows 98 it is recommended that you check in Device Manager and verify no conflicts or errors are currently occurring with the installed CD-ROM drive.

CD is a bad burned CD or CD was copied from protected CD

If you have created a CD (burned a CD) and are unable to read it or are getting errors with the CD, it is likely that either the CD was burned improperly or that the CD you copied was protected and that it cannot be copied. It is recommended you either attempt to burn the CD again or verify with the software vendor to verify that the CD is not protected from being copied.

CD is auto-running causing error

If you are using Windows 95 or Windows 98, autorun can, in some cases, cause errors when first placed in the computer. It is recommended that you eject the CD from the computer and when the CD is placed back into the computer, hold the left shift key on the keyboard. Holding the left shift key down will disable the auto-running feature temporarily. Once the CD-ROM light is done flashing, if you receive no error, open My Computer and right-click on the CD-ROM drive and click Explore to see if you receive errors reading the CD.

Windows is corrupted causing CD to generate error

If you are running Windows 95, Windows 98 or Windows ME, it is possible that Windows may be corrupted causing the CD-ROM drive to not be properly read and we recommend that it be tested from MS-DOS. Before trying the below recommendation, ensure that you have tried all of the above steps first.

We recommend that you use a bootable diskette that has CD-ROM drivers on it and test the CD-ROM drive from MS-DOS.

If you receive errors from MS-DOS it is likely that the CD-ROM drive is bad.

If you do not receive errors from MS-DOS and the CD-ROM drive reads properly, it is likely that Windows is corrupted and we recommend that it be reinstalled.

  • Additional information on bootable disks can be found on our boot disk page.

Bad drive / bad discs

If you've determined you're only encountering errors with only one disc you can attempt to recover the data from the disc and/or test the drive further using the software programs in document CH001090.


Search:

USB Device not Recognized in Windows

Search:

USB Device not recognized, Error USB Device, USB Device, Trouble USB Device, Syntac Error USB Device

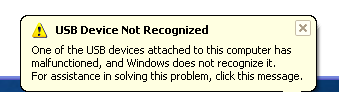
Are you getting a “USB device not recognized” error whenever you plug in a USB mouse, keyboard, or other USB device? I love USB and have 5 ports on my computer so that I can connect my mouse, keyboard, camera, phone, and printer to it all at once!

However, last weekend, my computer stopped recognizing my USB devices! The strange thing about it was that the USB ports were not bad because all of my devices were still getting power to them. I could still charge my cell phone without a problem!

usb device not recognized

So I started with the normal fixing methods, including uninstalling the drivers for my devices and reinstalling them. That didn’t work! Next I tried System Restore thinking that maybe I had installed something and it caused a conflict with the USB system drivers. That didn’t work!

I read online that in order to fix this problem I should go to Device Manager and uninstall all of the devices under USB Controllers. Restarted the computer, reinstalled the USB drivers, but the problem STILL did not go away!

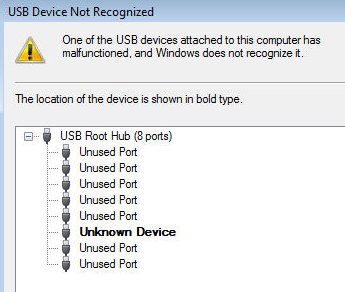
You may also see in Device Manager that the device shows up as an “Unknown Device”.

unknown usb device

So how did I finally fix the problem? Well, apparently it’s a super simple solution! No need to edit the registry, uninstall drivers, or anything of that sort.

Simply UNPLUG YOUR COMPUTER FROM THE POWER SUPPLY. Yes that’s it! Note that this does not mean just turning off your computer because modern computers don’t really turn off when you press the power button as the motherboard still gets power.

First to explain, the motherboard is where all of hardware of the computer is connected to, including the USB ports. Sometimes the motherboard needs to be “rebooted” also because something can go wrong, i.e. all your USB ports suddenly stop working. The small microprocessor on the motherboard will reload the drivers and your USB ports should be back to recognizing all devices!

So first turn off your computer using Shut Down or pressing the power button and then UNPLUG it from the wall outlet. Let it sit for about a minute and then plug it back in.

Hope this helps someone fix that pesky “USB device not recognized” Windows error!


Search:

USB Device not recognized, Error USB Device, USB Device, Trouble USB Device, Syntac Error USB Device

Categories

Access Media Collection Add HTML facebook on site addurl Administration Tools Adsense All Cat Anatomy Virus Android Animator Anomymity Anti Virus Applications Install BELAJAR PHOTOSHOP Blog Blufftop CA-CLIPPER INTERNAL ERROR cara cari uang dari internet cari uang dari internet cashfiesta Celebs Computer Desk Computer Hang Computer Icon Computer Management Computer Repair Computer Set Up Computer Tablet Computer Touch Screen Computer Troubleshooting Cookies Cookies Definitions Crack Create DVD Create DVD Maker Create PDF Create PDF using Smart PDF Creator D-Link D-Link Router Definitions of Virus Device Device Manager DNS Doc Protect Dongle USB Drive partitions Drive parts Driver Printer HP DVD compress DVD Drive Earn Money Easy Gif Animator Elastomer Eror Solution Error Computer ERROR Solutions Error windows explorer External Hard Drive Facebook Facebook and Site File Sharing Football Game Free Articles Free Internet GAME Game Sport Googel Google Talk Hack Password Hard Drive Hard Drive Partitioning Healty Help and Support Help Support Household Aplieance How to How to Download HP Lapotop Reviews IM Google Inside Adsense intall Intall Windows 7 Ultimates Internet Internet Browser Internet Explore Ipad Java Programe Java Script JPEG JPG GIF PNG BMP Keyboard Keygen Smadav 8.7 Laptop Laptop Computer Skin Laptop vs PC Life Style Local Area Network Maintanance and Repair Make CD iso Make DVD Make money online Make Money with blog Make Your Own Copy-Protected CD with Passive Protection Messenger and Chat Microsoft Mobile Aplications Mobile Phone Modem MotorSport MOVIE Ms Word Applications MS Word to PDF Ms Words My Computer Network Set Up Networking Office Online Shoping Operating System Partitions drive Password Wifi PC Desktop PDF EDITOR PDF Remover Photoshop Picture Portable Prevent Windows XP Print Printer Error Protect CD from Copy Protect Your Computer Reboot Application Remove Pasword Excel Restore Windows Registry Router Search Engine Index Search Engines Optimizer Security Security System Shortcut Smadav 8.7 Smart PDF Creator Social Networking Software software Protection Solving Probelm Startup Programs SuperBike System Registry System Restore Table Manager Test DVD Test DVD Drive Troubleshooting all Tutorial Tutorial Java TUTORIAL PHOTOSHOP uang gratis dari cashfiesta uang gratis dari internet Upload File to blogger Upload Files USB Install USB REMOVE USB Repair VGA Card VGA Conector VGA Informations Virtual Memory is to Low Virus Viture Windows 7 Watermark What is Cookies Wifi Wifi Pasword Finder Win Pes2011 Windows Windows Device Windows DVD Maker windows explorer cannot open Windows Mobile Wireless Wireless router Word Password Remover words documents cannot open Words error XFBML and HTML Facebook