Monday, 28 March 2011

Submit to Search Engines

To submit your blog/site to other Search Engines............
her
you should know that there are free submissions and paid submissions. Copy and paste the following URLs to the address bar of your browser to go there and submit your site to them.

For Yahoo go here. It is free but you need to have a Yahoo account which is also free. After logging in to yahoo.com click on "My Yahoo" button just under the Yahoo name.
TO VERIFY YOUR BLOG WITH YAHOO YOU ARE REQUIRED TO UPLOAD A FILE TO YOUR BLOG. SINCE THIS IS NOT ALLOWED THIS CANNOT BE DONE WITH YAHOO.
This will take you to a customised My Yahoo page. Scroll down it and click on "+ Add Content link right at the bottom of the page in the center. On the Add Content page click on "Add RSS by URL' link next to the Find button. In the text box add the link for your blog's RSS feed url. In Beta Blogger this is :

http://yourblogname.blogspot.com/feeds/posts/full

Add the name of your blog instead of 'yourblogname' above. Click Add. This will add the content of your blog to Yahoo and its spiders will visit your blog more often.

Add your site to Yahoo Site Explorer by going to :
https://siteexplorer.search.yahoo.com/


For MSN go here. This is also free.

For Open Directory dmoz. go here. This is also free but you will have to drill down into all the directories until you find the end directory for your subject. Then submit site URL.

For SearchIt go here. This is also free.

For Exalead go here.

For JDGO go here.

For Mixcat Directory go here.

For IceRocket go here.

For free Website Directory go here.

For Walhello go here.

For AllFreeThings go here.

For Aeiwi go here.

For AddUrlFree go here.

For Sahfor go here.

For Vxbox go here.

For ExactSeek go here.

For All the Web go here.

For Altavista go here.

For Scrub the Web go here.

For Sympatico go here.

For True Search go here.

For Lycos go here.

For Ask Jeeves go here.

To make your site more friendly to the search engine robots limit the content of you web page to 100k. Large Web pages rarely do well in search engines usually because of keyword saturation so be on the safe side and insure your Web page is robot friendly to all major search engines.

Your Title tags should contain maximum of 60 characters. These are the characters between and at the top of your template. The Meta Description Tag at the top of your template should contain keywords and keyword phrases that are important to your site. This tag is of this form :


There should be 150 characters maximum included in "Describe your website". The Meta Keywords Tag contains keywords and keyword phrases that are important to your site. The recommended maximum number of characters for this tag is 874. This tag is of the following format and is also placed at the top of your template :


Do not repeat the keywords placed as that is considered as spamming by the search engines.

METATAGS GENERATORS which generate the tags based on your input are located here :

http://www.addme.com/meta.htm

http://www.submitcorner.com/Tools/Meta/

http://vancouver-webpages.com/META/mk-metas.html

http://www.anybrowser.com/MetaTagGenerator.html

Just input your blog name and keywords and click Generate.

IMPROVE YOUR METATAGS at :

http://www.bluechillies.com/details/27486.html

How to Upload file to blogger

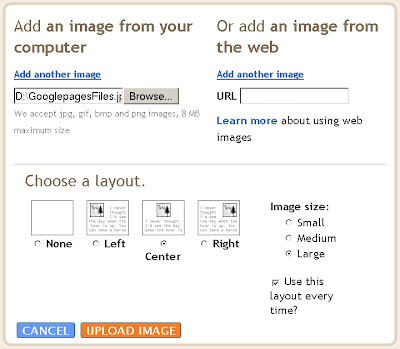
You can only upload image files to your Blogger blog. These can only be uploaded through your blog posts. To do this Login to Dashboard and click on "+New Post". The Post Editor will open. In the top frame of the Post Editor just mouseover all the icons. This will show the tooltips and click on the square bluish icon (Add Image). The upload Image dialog box opens. Click Browse under Add an image from your computer to choose the picture file on your PC. Click on file to highlight it and then click Open. You can also add an image from the web. Paste the URL of your image in the URL text box under "Or add an image from the web". Then choose the position you want the image to be in and the size of the image and click Upload. See Picture below


Click on picture to enlarge it.

SIZE OF FILES


There is a total limit of 300MB on the pictures you are uploading through Blogger, Picasa, or Hello to a free BlogSpot blog. If it is a ftp blog then it is space on your server you should take into account. If you are posting pictures through Blogger Mobile there is a limit of 250K per picture. However there is no way to know whether this limit is approached until you break through it.

Individual pages of your blog are limited to 1MB size. Your main page may run into this limit so limit the number of posts on main page by going to Settings----->Formatting----->Show 4 posts on Main Page----->Save Settings. This will also speed up the loading of your blog.

There is no limit to number of blogs you have or number of posts you can make. Also there is no limit to number of comments. Individual posts do not have limit but may be limited by page-size as described above.


FREE HOSTING


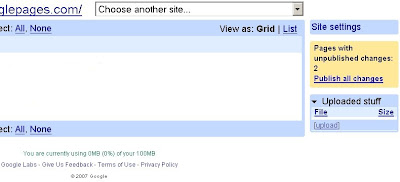
To overcome the size and file-type limit in your free blog try uploading your pictures to a freehostlike Googlepages. You can create 5 sites in Googlepages with each site having free 100 MB space to host files. To upload create a Googlespace account and click on Upload in bottom frame of sidebar. See picture below :


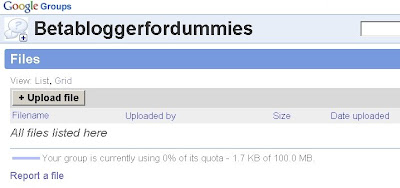
If you cannot create a Googlepages account create a Google Group of your own. You can upload 100 MB of total files here also. Click on "Files" after clicking on Manage Group. Then click on Upload File button. See Picture below:


Thus you can upload image, PDF, MP3, WAV, DOC, TXT and any other files to these freehosts. You can also upload image files to other freehosts like Flickr, Photobucket, Imagehosting etc. To upload files to Flickr see Youtube and Flickr. After uploading the files place your mouse cursor over the filename and right-click and choose Copy Link Location. This copies the location/URL/link of your file at the freehost. Then paste it into this code in your blog :

DOWNLOAD FILE

When viewers click on "DOWNLOAD FILE" they will get a dialog box prompting the to download your file. In this manner you can also create an image link as described in Making Image Link.


Read more: http://www.blogdoctor.me/2007/02/upload-files-to-blogger.html#ixzz1HvAXRs6n

Friday, 25 March 2011

Block Website with D-link Router

There are a lot of dangerous websites out there. Some contain viruses, and some contain content and images you do not want members of your family to stumble upon. There are several ways to block websites on individual computers, but if you want to apply these changes to every computer in your home, use the Website Filter option in your D-Link router.

How To Block Websites With Your D-Link Router

Not all routers will have this functionality. If your D-link router does not, try upgrading the firmware in the router to see if that functionality has been added later. The Website Filter section is located under the Advanced tab. You can either use the drop-down option to “DENY computers access to ONLY these sites” or “Allow computers access to ONLY these sites.” The second option is quite strict.
Login to your DLink router through your web browser. Click the advanced tab.
block websites with the d-link router
In the left column, click the Website Filter option. To block sites, enter their website addresses in the space provided (Do not add the http://). Blocking the websites at the router level ensures all traffic leaving your network will be affected by these rules. These include computers, smart phones, gaming consoles and anything else with a web browser.
You can block websites with Dlink router or change the DNS settings in your router and use a service like OpenDNS to block websites. Either way, take a moment to setup a blacklist and implement these filters to prevent members of your workplace or household from accessing sites you do not want them to.

Disable Wireless Router

You can disable a wireless router SSID broadcast and then connect to the router manually to improve security. This isn’t really necessary if you have WPA-2 enabled and have a secure password, but some people might prefer to have their router in stealth mode. When neighbors or strangers driving around down your street browse for a wireless connection, you might not want anyone to “see” your router. So, disable SSID broadcast and then set up a manual connection in Windows 7.

Disable The SSID Broadcast In The Router

Step one is to log in to the router and turn off the disable SSID broadcast. D-link, Linksys, Netgear and other routers handle this process differently, but you should find the SSID broadcast option in the Wireless settings of the router’s configuration.
disable wireless router ssid
Log in to the router and set the SSID broadcast to Disable.
connect to router with no SSID
In Windows 7,  go to Start -> Control Panel -> Network and Internet -> Network and Sharing Center. Then click on the “Connect to a network”  option.
connect to router with no SSID
Next, click “Manually connect to a wireless network.”
connect to router with no SSID
Lastly, fill in the details about your router. While you disabled the broadcast, the router still has its SSID–it just isn’t announcing it to the entire world.  Type the SSID in under “Network name.” Select the security type (WEP, WPA-2, etc) that your router uses. Then put in the password where it says “Security Key.”
You can choose the option to “Start this connection automatically” if you will be using this WiFi connection frequently.
Disable wireless router SSID to improve security, but keep in mind this can make connecting other devices, such as phones, tablets and gaming consoles a nightmare. Some devices may not let you manually input an SSID. If the device does not detect the your router SSID, it simply may not allow you to connect. So, depending on your need for wireless privacy, you may opt to either disable router SSID broadcast or simply give the router a name no one can associate with you and a strong WPA-2 password.
Disable SSID questions? Visit our forums and post a question in our networking section.

Blazing Fast External Hard Drive

How fast is fast enough when dealing with data transfer? When you’re dealing with backups or copying large files from one drive to another, you can never have too much speed. The new USB 3.0 spec emerged last year. The speed comparison between a USB 2.0 drive and a USB 3.0 drive is staggering. Fortunately, the costs have dropped and adding a USB 3.0 external hard drive to your computer has become an attractive idea.

USB 2.0 and USB 3.0 Speed Comparison

The leap in throughput was as substantial in USB 3.0 as it was between USB 1.0 and 2.0. With the newer USB 3.0 specification topping out near 5 Gbps, it is faster than the wired computer networks in most homes.
USB Speed Comparison chart
USB 1.0 speeds are 1.5 Mbps
USB 2.0 speeds are 480 Mbps
USB 3.0 speeds are 4800 Mbps

Investing In USB 3.0

Because the standard is relatively new, your computer may not have a USB 3.0 card installed. Motherboards will eventually ship with USB 3.0 on-board, but if your computer only has the older USB 2.0, then you’ll need to purchase a USB 3.0 card. The cable is also different. So there will be some investment costs in upgrading, but the price is minimal in comparison to the huge performance boost you’ll get after upgrading.
USB 3.0 hard driveUSB 3.0 Hard Drive
This USB 3.0 hard drive from Buffalo is said to out-perform internal hard drives. It is an external drive and would be great for moving massive amounts of data back and forth between computers or even just being used as a standard backup hard drive. It is backward compatible with USB 2.0, but you will want to invest in the USB 3.0 card to get the maximum performance. As with most external hard drives, this model also ships with its own cable, so you will not need to purchase the new USB 3.0 cable.
Buffalo Technology DriveStation 1 TB SuperSpeed USB 3.0 Desktop Hard Drive
View Other USB 3.0 hard drives

USB 3.0 cardUSB 3.0 PCI-Express
This Buffalo Technologies USB 3.0 card will enable your computer to get the full 4800 Mbps speeds out of your new USB 3.0 hard drive. You must have a PCI-Express port on your motherboard to install this, so make sure your motherboard has that expansion capability before purchasing. The card comes with a driver disk and is compatible with Windows XP, Windows Vista and Windows 7.
Buffalo Technology DriveStation SuperSpeed USB 3.0 PCI Express
View other USB 3.0 cards
In Conclusion
As file sizes and hard drives get larger and larger, the time it takes to backup and copy data will increase. Having a USB 3.0 hard drive in your computer will eventually become a necessity. If you deal with a lot of files, or are into movie and photo editing, upgrading to a faster hard drive is paramount in maintaining a productive work environment.

Creating a First Aid kit to Your PC


For many computer users, troubleshooting individual issues can be very time consuming and wasteful. If you value your time, you need to have a plan in place that will fix bugs quickly and efficiently.
The simplest way to accomplish this would be to create a fast “full reset” process for your system. The moment your computer starts to show signs of trouble, you can just wipe it clean instead of spending hours trying to fix malware, viruses or other obscure bugs.
This post is intended for people who’ve either:
  • just bought a new computer,
  • or who have just recovered from a major crash.
In order to do this properly, you’ll need to set up 2 different tools:
A fresh, fully-functional system image
The first thing that you’ll want to do is set up a fresh copy of Windows, with all of the latest updates. Next, you’ll want to install all of the programs that you might need. This may in include Firefox, MS Office, Adobe Suite, or any other applications you’ll use on a daily basis.
Once you’ve installed all of your applications, you’ll want to create a snapshot or “system image”. Backing up a system snapshot with pre-installed applications will allow you quickly reset your computer in one easy step, without having to spend hours manually loading these programs again.
Next, you’ll need to make several copies of this system state image. Keep one on-site, and one off-site.
This can be as simple as burning 2 DVDs and mailing one to a friend. Or, you can also try keeping one copy backed up with an online storage provider for easy download… or on another computer via FTP.*
A recent and up-to-date file backup
Of course, a good system image is just a time-saving tool. It isn’t enough to keep you protected. For that, you’ll need an automated backup process.
Automated backups are especially important because manual backups just don’t cut it. Just like starting a diet, backing up data is a habit that gets neglected and eventually dropped over time.
Another disadvantage of manual backups is that they leave a large “data-loss window”. Most home users will back up once per week or once per month. This leaves 7 to 30 days worth of your most important data at risk at all times. (Your most recent files are usually the most critical)
Compare this to an automated backup system that can copy files over every few minutes… and never forgets. It’s almost impossible to lose any data with these types of applications.
An off-site NAS box is good for remote backups. But the best solution would be an online backup service, since it’s much more resilient, secure and maintenance-free.
Once you’ve got a good system image and backup process in place, you now have a fast and convenient solution for 90% of your computer problems. If you start to notice your machine acting strangely, just reinstall your system image, then download your latest file backups on top of it.
This will help ensure that your machine is always fresh, clean and running smoothly.
* I’d strongly advise against storing any backup data with your web host, since it may be against their “Terms of Service”. Violating this agreement could get your web site shut down without notice.
About The Author: Storagepipe’s archiving and online backup are designed to help keep your system well-protected and ready for restoration on a moment’s notice.

Wired Network Set Up

A wireless network is convenient.  But in terms of speed, reliability and security, a wired network is the way to go. You can wire your entire home over a weekend and we’re going to give you some pointers on how to do this. When you’re finished, each computer in your house will have a Gigabit connection with blazing fast Internet and file-sharing capabilities.
What you’ll need for your wired network setup:

ethernet cable kit to wire a home network
PTC Premium 1000 ft Category 5e (Cat5e) Blue Ethernet Cable Kit with tester, crimper and connectors
WOOD SPADE BIT 1-1/2
Drywall Saw
50′ Electrician’s Fish Tape
Drill
Twine Heavy Duty
Cat 5e 8-Wire QuickPort Adaptor Jack (and wall plate)
Intel PWLA8391GT PRO/1000 GT PCI Network Adapter
D-Link DIR-655 Extreme N Gigabit Wireless Router
You might already have a Gigabit router and a Gigabit network card. Check your system specifications before buying them. The router above is only a recommendation. You can use any Gigabit router, but we recommend sticking with D-link routers or Linksys routers. The wired network router should have at least four LAN ports on the back.

Ethernet Network Setup

Of course, everyone’s network setup will be different. They theory is this: You have an Internet service coming into your home through a basement and you want to wire the house with Ethernet cabling.
wired router
The best way to do this is to situate your router in the basement near where you want to run your leads.
network wiring
Locate an electrical cable for an outlet on the first floor. This tells you where the wall upstairs. If you do not do this, you risk drilling through the floor and carpeting upstairs.
Once you locate the electrical cable, measure over several inches and drill your hole.
Next, go upstairs to the wall where you drilled your hole. You should see the electric outlet from the electrical cable you noticed in the basement. Using a step ladder and the drywall saw, carefully cut a 6 x 6 inch square hole in the wall near the ceiling (just large enough to fit your hand in). Cut the hole as clean as possible, as you will need to use the piece you remove to patch the wall afterward. You should see the 2 x 4 wall stud and the ceiling joists running across it.
You will now need to go to the second story and locate the wall directly above where you made the ceiling cutout. You will then need to cut a larger square to accommodate the drill. The idea is to go through the floorboards, miss the ceiling joist and then drill down through the stud of the wall where you made your smaller cut.
wired network
Then, go into the attic directly above the space where you made the larger cutout on the second floor. You can use the same method you used in the basement if the second floor room wall happens to have an electrical outlet. The electrical wires are likely run through the attic and down into the wall. Drill through the attic floor and then insert the electrical fish lead into the hole. You should be able to grab the fish in the hole you made in the second floor wall. Insert the fish into the hole you drilled in the floor and then pull it through on the first floor.
Tie and tape the twine to the hook on the end of the fish and return to the attic. It’s best if someone can hold the twine on the first floor so it doesn’t get tangled. Pull the twine up through the attic floor. Pull through several extra feet and tie it off on one of the trusses on the ceiling.
In the basement, work the fish upward, then return to the first floor and pull it through the opening where the twine is going up to the attic. Give yourself about ten feet of slack and then cut the twine. Tie and tape it to the fish and then return to the basement and pull it through the floor. You now have a single piece of heavy-duty twine leading from the basement all the way up to the attic.
Next, take some measurements and figure out how much Ethernet cable you’ll need to go up to the attic and then down into the rooms on the second level. Once you have the measurements, add an additional twenty feet ( it’s better to have extra cable than not enough). You should be able to run all of the lines up together if the hole you drilled is large enough for the wires to fit through easily (you do not wan to bend or crimp the network cables). If the holes are not large enough, run the network cables up one at a time. The trick to this part is to tape another piece of twine to the wired network cable going up so, when pulled through, you still have a piece of twine leading from the basement to the attic.
Tip: Even if you can fit all of the Ethernet cables through at the same time, you should still run the twine up to the attic and tie it off for future network setup use. You only want to cut holes in your wall once.
home network diagram
Once you have all of the network cables run, you can make the connections to the router and then to the wall jacks in the second floor rooms.
Learn how to make network cables here.

Integrating Wifi Into Your Network

You will still want to have a wireless network setup for portable devices such a smart phones and laptops. The router’s signal installed in your basement will not likely reach the second floor. You can install an old wireless router that has been converted into a Wireless Access Point on the second floor. Read more about converting a router to a wireless access point here. Or you can buy a Wireless Access Point (WAP)and install it upstairs. The WAP will plug into your wired network and provide WiFi for those areas of the home not covered by the router in the basement.
If you have questions about a network setup, contact us on our forums. Everyone’s network setup will be different, but wiring your home for Ethernet will provide you with a faster, safer network.

How to Set Up An Ad Hoc Network

Most people will have their wireless devices and computers setup for Infrastructure networking, meaning the network is handled by a router. If you are in a situation where you need to transfer files and data from one wireless computer to another, you can quickly setup an ad hoc network, however.  An ad hoc network is considered computer to computer networking without a router  or access point present.  One such application of this type of networking would be a business meeting environment, where you need to quickly transfer files to an associate. Simply setup an ad hoc network on your computer and then have the client search for and connect to the shared folder on your PC.

Configure An Ad Hoc Network

One computer will create the network and act as the host. The other computers will then search for and connect to the computer. Once the host computer is shut down or out of wireless range, the network is gone.
Setup the connection by going into the Control Panel and clicking on the Network Connections icon. Identify your wireless connection. Right-click the connection and then select Properties.
Click on the tab that says Wireless Networks.
setup an ad hoc network
In the Preferred Networks section, click the Add button.
Under the Association tab you will first give the network a name or what is called a Service Set Identifier (SSID). This is the name people will see when they look for available networks.
Set the Network Authentication as Open and then configure the encryption as WEP or WPA-2 (WEP is more compatible with older wireless adapters but considered weak encryption). Setup a password, then un-check This key is provided by me automatically. You will then check the box that says This is a computer to computer (ad hoc) network.
Note: It is imperative to setup a complicated password or strangers will be able to connect to your computer in public. Or when the ad hoc network is no longer needed, just delete it for security purposes.
Click OK to save your changes. Your network will now show up under the Preferred Networks section.
At this point, the host computer can then setup a shared folder. You can create a folder anywhere by right-clicking an open area and selecting New Folder. Name the folder anything you want and then right-click and select Sharing. Give the folder a name, and place any data you want to share into that folder. Newer versions of Windows will also have a Public folder, which is an open folder other computers can see an access once they connect.
Allow Other People To Connect To Your Computer
Now that you have created an ad hoc network, people can browse for your network and connect to you. To do this, locate the wireless icon in the system tray and then right-click that icon.
view available wireless networks
Click View Available Networks. If the host computer is powered on and configured correctly, it will be displayed as an available network. They will then need to type in the password to establish a connection.
If you have questions about how to setup and configure an ad hoc network, be sure to join our computer repair forums.

Wednesday, 23 March 2011

Viture Windows 7


Windows 7 memiliki sejumlah fitur-fitur baru yang di buat sedemikian rupa oleh Microsoft agar kinerja user dapat lebih ditingkatkna lagi ketika bekerja dengan sistem operasi ini. Fitur apa saja yang bisa Anda maksimalkan? Sedikitnya ada 10 fitur yang DHINATACOM lihat bisa Anda manfaatkan. Apa saja itu?
1. Taskbar Yang Lebih CerdasTaskbar Windows 7 hadir dengan tampilan baru dan fitur-fitur yang lebih cerdas. Dua fitur yang ditambahkan adalah Aero Peek dan Jump Lists.
2. Live Preview Yang Lebih Cepat, Lebih GesitWindows 7 menampilkan thumbnail semua jendela dari aplikasi yang sedang dibuka dalam satu tempat sekaligus, jadi user dapat melihat seluruh jendela dengan mudah.
3. Jump Lists: Menu context-sensitive pada Taskbar mengelompokkan berbagai daftar fitur juga dokumen dari sebuah aplikasi sebelum Anda membukannya melalui Start Menu.
4. System Tray Rasa Baru: System Tray yang letaknya dipojok kanan Taskbar yang memungkinkan pengguna untuk melihat berbagai pesan penting yang diberitahukan oleh sistem Windows 7. System Tray juga tempat untuk mengontrol berbagai device yang dipasang dan konektivitas yang sedang aktif.
5. Dukungan Format Media Baru Windows Media Player 12: Ingin memainkan lagu dari Apple iTunes Store tapi tidak menyukai iTunes? Dukungan format file media baru yang ada di Windows Media Player 12 memungkinkan Anda untuk memainkan audio dan video tanpa proteksi dari toko online Apple di Internet.
6. Action Center: Ini merupakan pembaruan dari fitur Security Center yang ada pada Windows Vista, menampilkan pemberitahuan berupa pesan dari sistem jika ada sesuatu yang tidak beres pada OS.
7. UAC (User Account Control) Dalam Kendali Anda: Jika Anda melihat Windows Vista terlalu “cerewet” menjaga keamanan, maka di Windows 7 Anda dapat mengaturnya agar tidak terlalu berlebihan seperti versi sebelumnya.
8. Library: Mengelompokkan berbagai folder dari berbagai lokasi dalam harddisk dalam satu tempat. Berbagai dokumen, musik, gambar dan video bisa Anda masukkan dalam Library. Jadi Anda dapat dengan mudah membuka koleksi file dengan satu kali klik melalui Windows Explorer.
9. Hardware Requirement Yang Masuk Akal: Sepanjang sejarah Windows, jika Microsoft merilis Windows versi terbaru pasti membutuhkan spesifikasi hardware yang lebih tinggi dibandingkan versi sebelumnya. Tapi lain halnya untuk Windows 7. Windows 7 dapat dijalankan dengan lebih baik dari pada Windows Vista pada hardware yang sama. Terbukti banyak Netbook yang memiliki hardware lowend dapat menjalankan Windows 7 dengan cukup baik.

Restore Windows Registry


Why?
    If your computer is crashing and you don't know why, restoring a recent working registry can be very helpful and will often fix your problems.  Be aware though that this will most likely cause software that was installed after you backed up your registry to not work properly.  Of course, it won't remove any files or anything, but the registry is like Windows' brain. You took out its memory of when that program was installed, so as far as the registry knows, that software was never installed (even though its files exist on the hard drive).  You will just have to reinstall the software after restoring your registry. This tutorial assumes you have backed up your registry according to the guidelines in HowTo Backup Windows Registry.
How?
    1. You can do this similarly to how you backed up your registry.  Again, there are two ways (actually many) - a simple way, and an effective way. First, the easy way: 2. Go to My Computer-C:-backup. Click and drag to highlight all the files there that you want to restore.  Right click on them and go to copy. Now, close that window, go to My Computer-C:-Windows. Then right click and go to paste.  Say yes, you want to overwrite. Now for the safer way: 3. Boot your computer with a boot disk or by pressing F8 just before your computer says "Starting Windows..."  Choose Command Prompt Only as your boot option. Now type in these commands in sequence to restore your registry:
      cd c:\windows     (changes directory to Windows) attrib user.dat -h -r   (makes file not hidden/restricted) attrib system.dat -h -r     (same) cd c:\backup     (changes directory to your backup dir) copy user.dat c:\windows     (copy file to backup folder) copy system.dat c:\windows     (same) copy win.ini c:\windows     (same) copy system.ini c:\windows     (same) cd c:\windows     (changes directory to Windows) attrib user.dat +h +r     (gives attributes back to file) attrib system.dat +h +r     (same)
    Now you have properly restored your windows registry. Power on your computer and see if your problem(s) are fixed.  *TIP: You can copy and paste the commands above into a file in Notepad with slight modifications (no "cd" commands. Instead just use full paths for each command i.e. copy c:\backup\user.dat c:\windows). Then save the file somewhere as restore.bat. Then you can just run restore.bat anytime to restore your registry (preferably after booting to DOS).

How to recover from a corrupted registry that prevents Windows XP from starting


To continue receiving security updates for Windows, make sure you're running Windows XP with Service Pack 3 (SP3). For more information, refer to this Microsoft web page: Support is ending for some versions of Windows

This article describes how to recover a Windows XP system that does not start because of corruption in the registry. This procedure does not guarantee full recovery of the system to a previous state; however, you should be able to recover data when you use this procedure. 

Warning Do not use the procedure that is described in this article if your computer has an OEM-installed operating system. The system hive on OEM installations creates passwords and user accounts that did not exist previously. If you use the procedure that is described in this article, you may not be able to log back into the recovery console to restore the original registry hives. 

You can repair a corrupted registry in Windows XP. Corrupted registry files can cause a variety of different error messages. See the Microsoft Knowledge Base for articles about error messages that are related to registry issues. 

This article assumes that typical recovery methods have failed and access to the system is not available except by using Recovery Console. If an Automatic System Recovery (ASR) backup exists, it is the preferred method for recovery. Microsoft recommends that you use the ASR backup before you try the procedure described in this article.

Note Make sure to replace all five of the registry hives. If you only replace a single hive or two, this can cause potential issues because software and hardware may have settings in multiple locations in the registry.

Manual steps to recover a corrupted registry that prevents Windows XP from starting

The procedure that this article describes uses Recovery Console and System Restore. This article also lists all the required steps in specific order to make sure that the process is fully completed. When you finish this procedure, the system returns to a state very close to the state before the problem occurred. If you have ever run NTBackup and completed a system state backup, you do not have to follow the procedures in parts two and three. You can go to part four.

Part one

In part one, you start the Recovery Console, create a temporary folder, back up the existing registry files to a new location, delete the registry files at their existing location, and then copy the registry files from the repair folder to the System32\Config folder. When you have finished this procedure, a registry is created that you can use to start Windows XP. This registry was created and saved during the initial setup of Windows XP. Therefore any changes and settings that occurred after the Setup program was finished are lost.

To complete part one, follow these steps:
  1. Insert the Windows XP startup disk into the floppy disk drive, or insert the Windows XP CD-ROM into the CD-ROM drive, and then restart the computer. 
    Click to select any options that are required to start the computer from the CD-ROM drive if you are prompted to do so.
  2. When the "Welcome to Setup" screen appears, press R to start the Recovery Console.
  3. If you have a dual-boot or multiple-boot computer, select the installation that you want to access from the Recovery Console.
  4. When you are prompted to do so, type the Administrator password. If the administrator password is blank, just press ENTER.
  5. At the Recovery Console command prompt, type the following lines, pressing ENTER after you type each line:
    md tmp
    copy c:\windows\system32\config\system c:\windows\tmp\system.bak
    copy c:\windows\system32\config\software c:\windows\tmp\software.bak
    copy c:\windows\system32\config\sam c:\windows\tmp\sam.bak
    copy c:\windows\system32\config\security c:\windows\tmp\security.bak
    copy c:\windows\system32\config\default c:\windows\tmp\default.bak

    delete c:\windows\system32\config\system
    delete c:\windows\system32\config\software
    delete c:\windows\system32\config\sam
    delete c:\windows\system32\config\security
    delete c:\windows\system32\config\default

    copy c:\windows\repair\system c:\windows\system32\config\system
    copy c:\windows\repair\software c:\windows\system32\config\software
    copy c:\windows\repair\sam c:\windows\system32\config\sam
    copy c:\windows\repair\security c:\windows\system32\config\security
    copy c:\windows\repair\default c:\windows\system32\config\default
  6. Type exit to quit Recovery Console. Your computer will restart.
Note This procedure assumes that Windows XP is installed to the C:\Windows folder. Make sure to change C:\Windows to the appropriate windows_folder if it is a different location.

If you have access to another computer, to save time, you can copy the text in step five, and then create a text file called "Regcopy1.txt" (for example). To use this file, run the following command when you start in Recovery Console:
batch regcopy1.txt
With the batch command in Recovery Console, you can process all the commands in a text file sequentially. When you use the batch command, you do not have to manually type as many commands.

Part two

To complete the procedure described in this section, you must be logged on as an administrator, or an administrative user (a user who has an account in the Administrators group). If you are using Windows XP Home Edition, you can log on as an administrative user. If you log on as an administrator, you must first start Windows XP Home Edition in Safe mode. To start the Windows XP Home Edition computer in Safe mode, follow these steps.

Note Print these instructions before you continue. You cannot view these instructions after you restart the computer in Safe Mode. If you use the NTFS file system, also print the instructions from Knowledge Base article KB309531. Step 7 contains a reference to the article.
  1. Click Start, click Shut Down (or click Turn Off Computer), click Restart, and then click OK (or click Restart).
  2. Press the F8 key. 

    On a computer that is configured to start to multiple operating systems, you can press F8 when you see the Startup menu.
  3. Use the arrow keys to select the appropriate Safe mode option, and then press ENTER.
  4. If you have a dual-boot or multiple-boot system, use the arrow keys to select the installation that you want to access, and then press ENTER.
In part two, you copy the registry files from their backed up location by using System Restore. This folder is not available in Recovery Console and is generally not visible during typical usage. Before you start this procedure, you must change several settings to make the folder visible:
  1. Start Windows Explorer.
  2. On the Tools menu, click Folder options.
  3. Click the View tab.
  4. Under Hidden files and folders, click to select Show hidden files and folders, and then click to clear the Hide protected operating system files (Recommended)check box.
  5. Click Yes when the dialog box that confirms that you want to display these files appears.
  6. Double-click the drive where you installed Windows XP to display a list of the folders. If is important to click the correct drive.
  7. Open the System Volume Information folder. This folder is unavailable and appears dimmed because it is set as a super-hidden folder.

    Note This folder contains one or more _restore {GUID} folders such as "_restore{87BD3667-3246-476B-923F-F86E30B3E7F8}".

    Note You may receive the following error message:
    C:\System Volume Information is not accessible. Access is denied.
    If you receive this message, see the following Microsoft Knowledge Base article to gain access to this folder and continue with the procedure:
    309531  How to gain access to the System Volume Information folder
  8. Open a folder that was not created at the current time. You may have to click Detailson the View menu to see when these folders were created. There may be one or more folders starting with "RPx under this folder. These are restore points.
  9. Open one of these folders to locate a Snapshot subfolder. The following path is an example of a folder path to the Snapshot folder:
    C:\System Volume Information\_restore{D86480E3-73EF-47BC-A0EB-A81BE6EE3ED8}\RP1\Snapshot
  10. From the Snapshot folder, copy the following files to the C:\Windows\Tmp folder:
    • _REGISTRY_USER_.DEFAULT
    • _REGISTRY_MACHINE_SECURITY
    • _REGISTRY_MACHINE_SOFTWARE
    • _REGISTRY_MACHINE_SYSTEM
    • _REGISTRY_MACHINE_SAM
  11. Rename the files in the C:\Windows\Tmp folder as follows:
    • Rename _REGISTRY_USER_.DEFAULT to DEFAULT
    • Rename _REGISTRY_MACHINE_SECURITY to SECURITY
    • Rename _REGISTRY_MACHINE_SOFTWARE to SOFTWARE
    • Rename _REGISTRY_MACHINE_SYSTEM to SYSTEM
    • Rename _REGISTRY_MACHINE_SAM to SAM
These files are the backed up registry files from System Restore. Because you used the registry file that the Setup program created, this registry does not know that these restore points exist and are available. A new folder is created with a new GUID under System Volume Information and a restore point is created that includes a copy of the registry files that were copied during part one. Therefore, it is important not to use the most current folder, especially if the time stamp on the folder is the same as the current time. 

The current system configuration is not aware of the previous restore points. You must have a previous copy of the registry from a previous restore point to make the previous restore points available again. 

The registry files that were copied to the Tmp folder in the C:\Windows folder are moved to make sure that the files are available under Recovery Console. You must use these files to replace the registry files currently in the C:\Windows\System32\Config folder. By default, Recovery Console has limited folder access and cannot copy files from the System Volume folder. 

Note The procedure described in this section assumes that you are running your computer with the FAT32 file system. For more information about how to access the System Volume Information Folder with the NTFS file system, click the following article number to view the article in the Microsoft Knowledge Base:
309531  How to gain access to the System Volume Information folder

Part Three

In part three, you delete the existing registry files, and then copy the System Restore Registry files to the C:\Windows\System32\Config folder:
  1. Start Recovery Console.
  2. At the command prompt, type the following lines, pressing ENTER after you type each line:
    del c:\windows\system32\config\sam 

    del c:\windows\system32\config\security 

    del c:\windows\system32\config\software 

    del c:\windows\system32\config\default 

    del c:\windows\system32\config\system 

    copy c:\windows\tmp\software c:\windows\system32\config\software

    copy c:\windows\tmp\system c:\windows\system32\config\system 

    copy c:\windows\tmp\sam c:\windows\system32\config\sam 

    copy c:\windows\tmp\security c:\windows\system32\config\security 

    copy c:\windows\tmp\default c:\windows\system32\config\default
    Note Some of these command lines may be wrapped for readability.
  3. Type exit to quit Recovery Console. Your computer restarts.
Note This procedure assumes that Windows XP is installed to the C:\Windows folder. Make sure to change C:\Windows to the appropriate windows_folder if it is a different location.

If you have access to another computer, to save time, you can copy the text in step two, and then create a text file called "Regcopy2.txt" (for example). To use this file, run the following command when you start in Recovery Console:
batch regcopy2.txt

Part Four

  1. Click Start, and then click All Programs.
  2. Click Accessories, and then click System Tools.
  3. Click System Restore, and then click Restore to a previous RestorePoint.

Install Windows 7 Ultimate


Proses setting di BIOS : Nyalakan komputer, lalu masuk ke BIOS untuk mensetting awal Booting OS (operating system) :D
clip_image002
Rubahlah settingan awal booting tersebut ke CD ROM / DVD ROM, klik F5 menggunakan keyboard untuk memindahkan urutan booting :D
clip_image004
Sebelum anda exit atau keluar dari BIOS, masukkan DVD windows 7 Ultimate. Kemudian tekan tombol F10 SAVE & EXIT (tergantung settingan BIOS). Maka system akan merestart komputer :D

Proses Install Windows 7 Ultimate

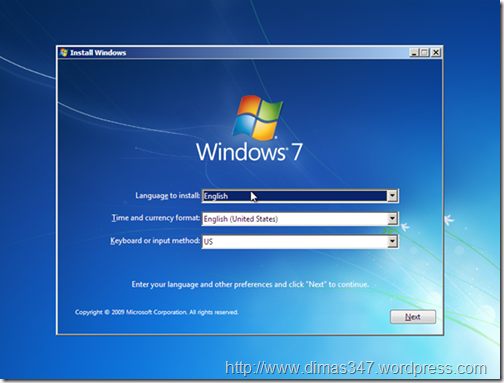
Setelah restart tunggu sampai muncul tulisan “Press any key to instal from CD/DVD …”. setelah itu tekan sembarang tombol, sehingga komputer akan melakukan proses booting lewat DVD ROM. Tunggu sampai terlihat gambar dibawah ini :
clip_image006
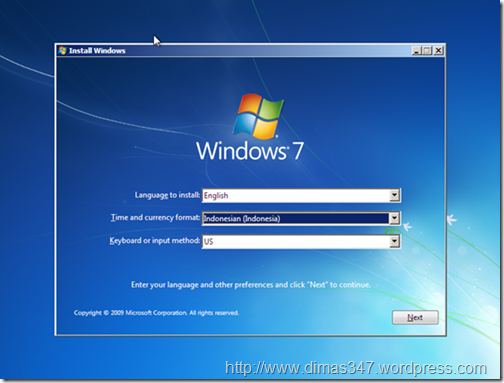
Aturlah Format Bahasa, waktu, mata uang dan jenis keyboard yang digunakan, misalkan disini kita menggunakan format waktu dan mata uang Indonesia :
clip_image008
Kemudian klik Next untuk melanjutkan proses instalasi :D Sehingga akan muncul tampilan pada gambar di bawah ini :
clip_image010
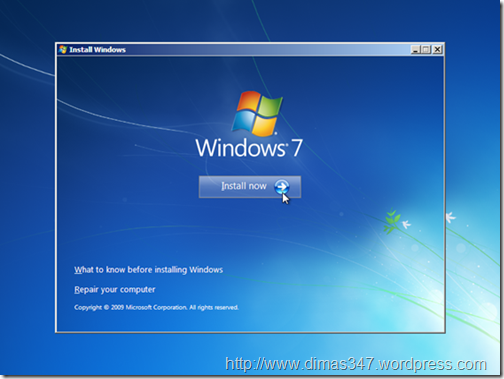
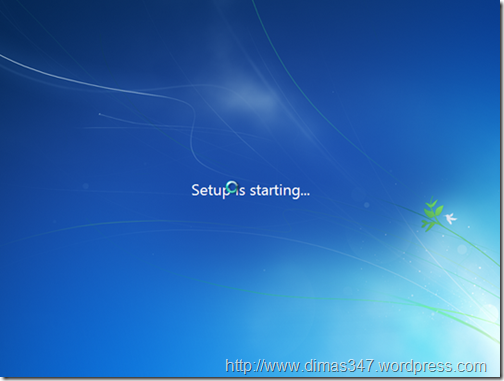
Klik tombol install now untuk melanjutkan proses instalasi :D Sehingga akan muncul gambar seperti di bawah ini :
clip_image012
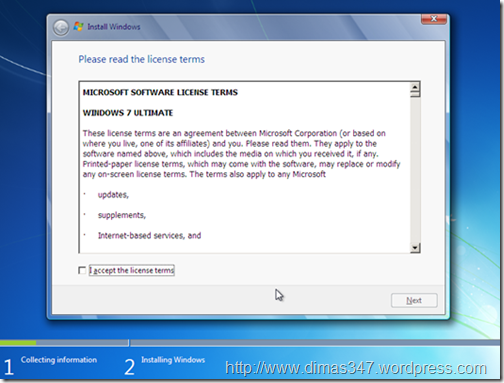
Tunggu proses loading sampai terlihat proses selanjutnya. Ceklis chekbox yang tertuliskan “I accept the license terms”, setelah itu klik tombol Next untuk melanjutkan proses instalasi :D Seperti terlihat gambar di bawah ini :
clip_image014
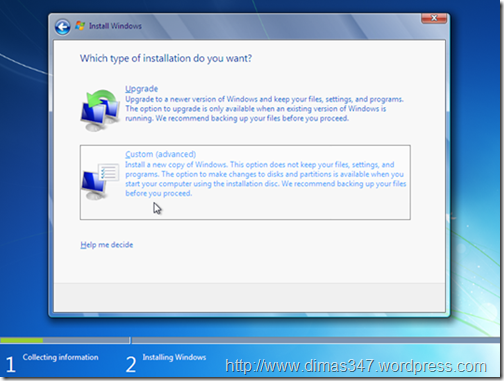
Setelah itu masuk ke proses selanjutnya. Karena ini adalah proses instalasi dari komputer yang belum terinstal sistem operasi windows, maka pilih bagian Custom. Jika memilih Upgrade berarti mengupgrade sistem operasi windows versi lama ke windows 7 :D Seperti gambar di bawah ini :
clip_image016
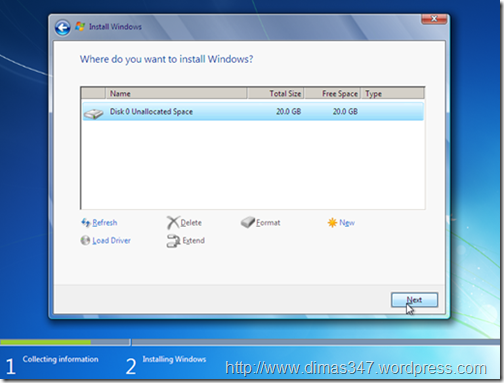
Karena komputer yang digunakan adalah baru, maka biasanya hanya terdapat 1 partisi hardisk. Minimal untuk instalasi windows 7 adalah 20 GB. Karena hardisk yang digunakan adalah 20GB jadi hardisk tidak perlu dipartisi. Klik next untuk melanjutkan proses instalasi :D Seperti gambar di bawah :
clip_image018
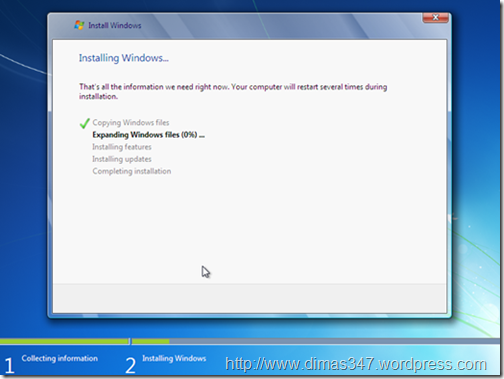
Tunggu sampai windows selesai proses instalasi. Jika telah selesai, maka komputer akan merestart sistem. Setelah beres Windows 7 Ultimate telah terinstall dan tinggal dilakukan proses konfigurasi :D
clip_image020
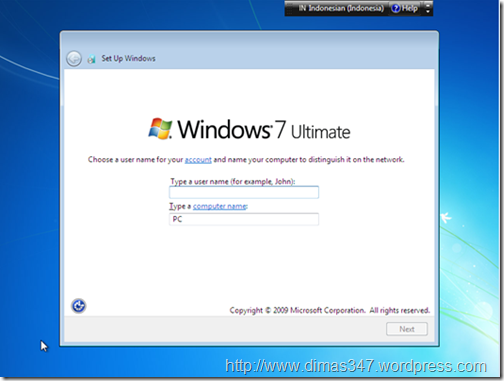
Setelah komputer merestart maka komputer akan melakukan proses konfigurasi awal dulu sebelum dapat digunakan. Untuk konfigurasi pertama adalah konfigurasi Username (Nama Pengguna) dan Computer Name (Nama Komputer), masukkan sesuai dengan yang anda suka. Setelah itu klik tombol Next. Seperti gambar di bawah :
clip_image022
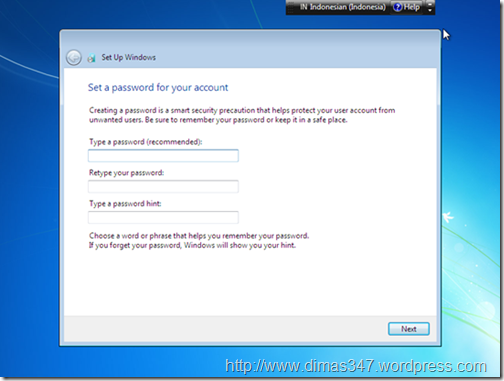
Setelah itu masukkan password yang akan digunakan untuk Username tersebut. Jika tidak akan menggunakan password maka tinggal klik Next saja :D
clip_image024
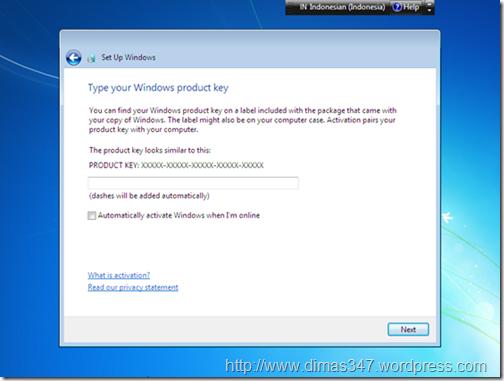
Setelah itu masukkan Serial Number Windows 7 yang tertera pada Cover DVD Windows 7 Ultimate. Jika anda menggunakan versi trial, anda tidak perlu memasukan produk key, cukup klik tombol Next :D
clip_image026
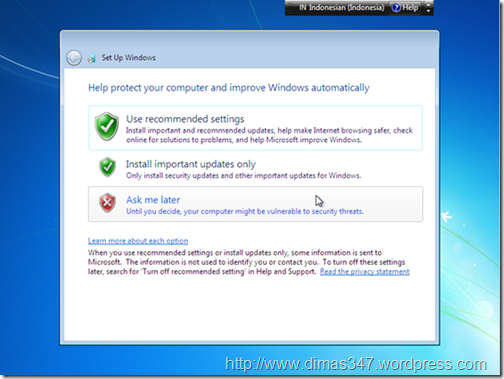
Pilih pengaturan use recommended settings atau sesuai dengan yang anda inginkan :D
clip_image028
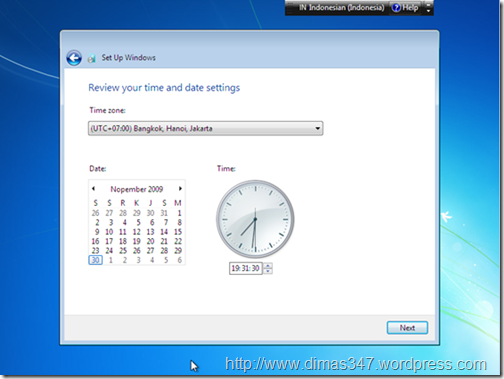
Setelah itu atur waktu sesuai dengan waktu saat ini. Setelah selesai klik tombol Next :D
clip_image030
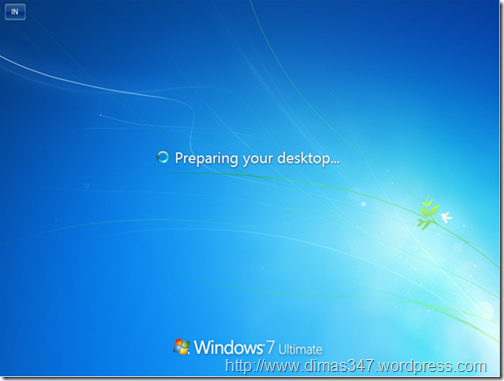
Setelah itu windows selesai melakukan proses konfigurasi, tunggu hingga windows mempersiapkan desktop untuk Username yang anda buat sebelumnya :D
clip_image032
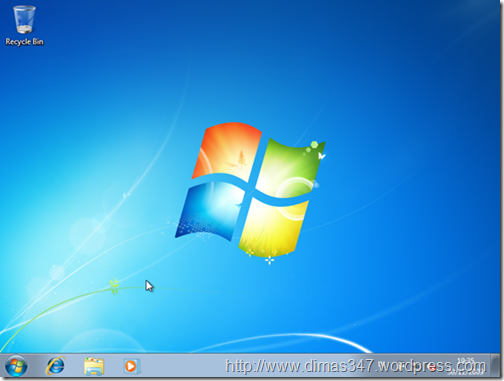
Sekarang anda telah berhasil menginstall Windows 7 Ultimate :D Selamat menggunakannya :D
clip_image034
Jika kalian bermasalah dengan lisensi pada Windows 7 Ultimate maka kalian bisa buka postingan di blog saya yang satu ini http://dimas347.wordpress.com/2010/06/22/buat-genuine-windows-seven-ultimate/ :D Selamat mencoba :D

Categories

Access Media Collection Add HTML facebook on site addurl Administration Tools Adsense All Cat Anatomy Virus Android Animator Anomymity Anti Virus Applications Install BELAJAR PHOTOSHOP Blog Blufftop CA-CLIPPER INTERNAL ERROR cara cari uang dari internet cari uang dari internet cashfiesta Celebs Computer Desk Computer Hang Computer Icon Computer Management Computer Repair Computer Set Up Computer Tablet Computer Touch Screen Computer Troubleshooting Cookies Cookies Definitions Crack Create DVD Create DVD Maker Create PDF Create PDF using Smart PDF Creator D-Link D-Link Router Definitions of Virus Device Device Manager DNS Doc Protect Dongle USB Drive partitions Drive parts Driver Printer HP DVD compress DVD Drive Earn Money Easy Gif Animator Elastomer Eror Solution Error Computer ERROR Solutions Error windows explorer External Hard Drive Facebook Facebook and Site File Sharing Football Game Free Articles Free Internet GAME Game Sport Googel Google Talk Hack Password Hard Drive Hard Drive Partitioning Healty Help and Support Help Support Household Aplieance How to How to Download HP Lapotop Reviews IM Google Inside Adsense intall Intall Windows 7 Ultimates Internet Internet Browser Internet Explore Ipad Java Programe Java Script JPEG JPG GIF PNG BMP Keyboard Keygen Smadav 8.7 Laptop Laptop Computer Skin Laptop vs PC Life Style Local Area Network Maintanance and Repair Make CD iso Make DVD Make money online Make Money with blog Make Your Own Copy-Protected CD with Passive Protection Messenger and Chat Microsoft Mobile Aplications Mobile Phone Modem MotorSport MOVIE Ms Word Applications MS Word to PDF Ms Words My Computer Network Set Up Networking Office Online Shoping Operating System Partitions drive Password Wifi PC Desktop PDF EDITOR PDF Remover Photoshop Picture Portable Prevent Windows XP Print Printer Error Protect CD from Copy Protect Your Computer Reboot Application Remove Pasword Excel Restore Windows Registry Router Search Engine Index Search Engines Optimizer Security Security System Shortcut Smadav 8.7 Smart PDF Creator Social Networking Software software Protection Solving Probelm Startup Programs SuperBike System Registry System Restore Table Manager Test DVD Test DVD Drive Troubleshooting all Tutorial Tutorial Java TUTORIAL PHOTOSHOP uang gratis dari cashfiesta uang gratis dari internet Upload File to blogger Upload Files USB Install USB REMOVE USB Repair VGA Card VGA Conector VGA Informations Virtual Memory is to Low Virus Viture Windows 7 Watermark What is Cookies Wifi Wifi Pasword Finder Win Pes2011 Windows Windows Device Windows DVD Maker windows explorer cannot open Windows Mobile Wireless Wireless router Word Password Remover words documents cannot open Words error XFBML and HTML Facebook